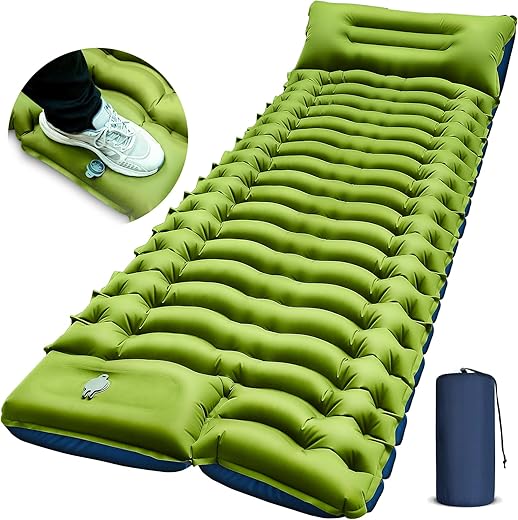
Packing a self-inflating sleeping pad doesn’t have to be intimidating, and this step-by-step guide is here to help you with empathy and ease. First, you’ll learn how to properly deflate the pad by opening the valves and pressing out any excess air, ensuring you won’t struggle with it later. Next, the guide will cover the best way to roll the pad tightly to minimize space and avoid damage. Finally, we’ll discuss the best storage options, emphasizing the importance of keeping it in a protective stuff sack to prolong its lifespan. With these simple steps, you can feel confident that your sleeping pad is well-prepped for your next adventure, providing comfort and support when you need it most.


Guide to Setting Up
Remove from Storage
Remove the self-inflating sleeping pad from its storage bag. Ensure that the area around you is clean and free of debris to prevent any damage to the pad. Lay the pad flat on the ground and give it a moment to start inflating as it absorbs air.
Inspect the pad for any signs of wear or damage before fully extending it. Smooth out any creases or folds to allow for maximum inflation and comfort. Make sure to keep the pad away from sharp objects or rough surfaces during this process to maintain its durability. Adjust the orientation as needed to secure an optimal setup in your camping or resting area.
Open the Valve
Locate the valve on your sleeping pad. This is typically situated on one end of the pad, often marked by a small plastic twist cap or a button. Once found, position your fingers around the valve and open it by turning it counterclockwise. You should hear a noticeable hiss as any remaining air inside the pad escapes. This step is crucial for fully deflating your sleeping pad, making it easier to pack and store.
Ensure that you press down gently on the pad while twisting the valve to help push out any trapped air. For example, if you notice that the pad is still partially inflated after opening the valve, continue to manually press down along the length of the pad. This will allow for a more efficient deflation process. After all the air has been released, you can close the valve securely by turning it clockwise to prevent any air from seeping back in.
Roll the Sleeping Pad
- Start from the opposite end of the valve. Position yourself so that you can easily access the entire length of the sleeping pad.
- Carefully roll the sleeping pad toward the valve. Hold the edge with both hands to maintain control.
- Apply even pressure as you roll. This helps to push out any trapped air, which can otherwise create bulges in the rolled pad.
- Aim for a tight roll. A snug roll is essential for efficient packing and carrying. For example, rolling tightly will minimize the space your sleeping pad occupies in your backpack, allowing for more room for other gear.
- If necessary, stop periodically to check for excess air. If you find any, unroll the pad slightly to expel air before continuing your roll.
- Secure the rolled pad with straps or a compression sack. This ensures your sleeping pad stays compact and doesn’t unravel during transport.
Secure the Roll
Secure the rolled pad tightly by using the attached straps, if provided. Loop the straps around the entire roll, ensuring they are evenly spaced to prevent it from unraveling. Pull the straps snugly, but be careful not to over-tighten, which might cause damage to the pad. If your sleeping pad lacks these straps, opt for a sturdy piece of rope or a thick rubber band. Cut a length of rope about three to four feet long, or grab a sizable rubber band. Place the rolled pad on a flat surface and wrap the rope around the middle of the roll several times, tying a secure knot once it’s snug. For a rubber band, stretch it around the middle of the pad, ensuring it engages well with both ends to keep them from spreading apart. Make sure the roll is tightly secured to preserve space in your pack and maintain the longevity of the pad.
Pack in Storage Bag
Roll the sleeping pad tightly and securely before attempting to place it in the storage bag. Push the pad into the bag, ensuring it fits snugly. If you find that the pad is slightly loose within the bag, release the pad and re-roll it with even tighter compression to eliminate any extra space. For example, if using a foam sleeping pad that tends to retain its shape, apply more pressure during the rolling process to achieve a compact roll.
Avoid cramming the sleeping pad into the bag if it does not fit comfortably. Excess pressure can lead to material stress and even tears. Instead, consider using a slightly larger compression sack or adjust your rolling technique. If you are using an inflatable pad, ensure the valve is closed tightly before rolling to minimize the risk of unrolling or damage while on the go.
Store in a Cool, Dry Place
Store the packed sleeping pad in a cool, dry place away from direct sunlight. Find a location that remains consistent in temperature, such as a closet or a storage bin in your home, where humidity is minimal. Ensure this space is free from moisture to prevent mold growth. Avoid placing the sleeping pad in garages, attics, or areas that experience temperature fluctuations as these conditions might damage the material over time.
Protect your sleeping pad by keeping it out of direct sunlight. Avoid areas near windows or under awnings where UV rays can degrade the fabric and reduce its insulating properties. Instead, keep it tucked inside its original storage bag or a breathable fabric sack. Regularly check the storage area for dampness or pests to ensure your gear remains in optimal condition.
Final Packing Tips
In conclusion, mastering the packing technique for your self-inflating sleeping pad not only helps in preserving its longevity but also enhances your overall camping experience. By carefully rolling it up, ensuring the valve is closed, and utilizing a compression sack if available, you’ll simplify transport and save space in your gear. With these tips in mind, you’re now prepared to hit the trails with confidence, keeping your essential gear organized and easily accessible for your next outdoor adventure.
Essential Packing Supplies

Maximize Your Comfort
Step-by-Step Guide to Maximize Comfort and Convenience
- Unroll the Pad: Start by unrolling the self-inflating sleeping pad on a flat surface. Ensure the valve is open to allow air to fill the pad automatically
- Wait for Inflation: Allow the pad to self-inflate for several minutes. You may notice that it inflates partially on its own; this is normal and means it’s working
- Top Off with Breath: If the pad isn’t fully inflated after a few minutes, you can add a few breaths of air through the valve for additional firmness. Be careful not to overinflate
- Close the Valve: Once the pad is at your desired firmness, tightly close the valve to prevent air from escaping while you use it
- Use a Sleeping Bag or Liners: For added comfort and insulation, consider using a sleeping bag or liners on top of the sleeping pad, as they work well together for a better night’s sleep
Everything You Need to Know
Yes, self-inflating sleeping pads can be patched if they develop a leak. The repair process generally involves the following steps:
- Locate the Leak: Inflate the sleeping pad and listen for hissing sounds or use a mixture of water and soap to identify any bubbles forming at the site of the leak.
- Clean the Area: Once the leak is found, clean the area around it with a mild soap solution, then rinse and allow it to dry thoroughly. This ensures the patch adheres properly.
- Prepare the Patch: Many self-inflating sleeping pads come with a repair kit, which usually includes adhesive and fabric patches. If you do not have a repair kit, you can use patch material like tenacious tape, bicycle tire patch kits, or other waterproof fabric.
- Apply Adhesive: Apply the adhesive to both the patch and the area around the leak, following the adhesive manufacturer’s instructions.
- Place the Patch: Place the patch over the leak and press it down firmly to remove any air bubbles. Ensure the patch covers the leak adequately.
- Cure Time: Allow the adhesive to cure for the time specified by the adhesive manufacturer, usually several hours to a day.
- Test the Repair: Once the adhesive has fully cured, inflate the pad again and check for leaks to ensure the patch was successful.
By following these steps, you can effectively repair your self-inflating sleeping pad and extend its usability.






Hey, this guide is super helpful! But do you have any advanced tips for packing a self-inflating sleeping pad? Like, what’s the best way to maintain it long-term or any tricks to get it even smaller? Any pro tips would be awesome!
Yo, this was a solid guide! But can you also cover how to clean and maintain sleeping pads? Like, what’s the best way to wash it without damaging it? Also, maybe some tips on patching up holes if they happen? Would be super useful!
Thanks for your comment! We’ll add a cleaning and maintenance guide soon. It’s important to keep your gear in top shape, and knowing how to patch leaks is crucial too. Keep an eye out for that article!
I’d love to see a guide on how to choose the right self-inflating sleeping pad for different types of camping! Also, maybe some comparisons between brands like Therm-a-Rest and Big Agnes would be dope. Just sayin’!
Great suggestion! We’ll definitely look into creating a comparison guide for those brands. Understanding the differences can really help campers make informed choices. Stay tuned!
Thanks for the feedback! A great tip is to always make sure your pad is completely deflated before rolling it up. You can also try using a compression sack for even smaller packing. Regularly cleaning the valve and checking for leaks can also help extend the life of your pad. Happy camping!