Did you know that the average person spends about 30% of their life sleeping? Now imagine squeezing that precious rest into a compact space while hiking miles through the wilderness. For outdoor enthusiasts, a lightweight sleeping bag is not just a luxury; it’s a lifeline that balances comfort and practicality. Whether you’re a seasoned hiker or a novice camper, understanding how to pack your sleeping bag efficiently can significantly enhance your outdoor experience. In this blog post, we’ll explore the best practices for packing a lightweight sleeping bag, ensuring you save precious space and preserve its warmth—all while enjoying your adventures to the fullest. Let’s dive in!


Packing Your Sleeping Bag: A Quick Guide
Understanding Lightweight Sleeping Bags
Lightweight sleeping bags are essential gear for backpackers and campers who prioritize mobility without sacrificing comfort. When choosing a lightweight sleeping bag, a few key characteristics come into play, involving materials, insulation types, and respective benefits for various outdoor activities. This guide will break down these aspects to ensure you make an informed decision on your next adventure.
Key Characteristics of Lightweight Sleeping Bags
1. Material Composition
The materials used in lightweight sleeping bags significantly impact their overall performance, durability, and weight. The two main components to consider are the outer shell fabric and the inner lining, as they affect breathability, moisture-wicking capabilities, and thermal efficiency.
- Outer Shell: Look for fabrics like ripstop nylon or polyester, which are lightweight yet strong. Consider options with water-resistant coatings for added durability, such as Mountain Hardwear Ghost Whisperer with its half-weight nylon.
- Inner Lining: Soft polyester or nylon is commonly used to provide comfort against the skin. Brands like Sierra Designs offer bags with moisture-wicking inner linings that enhance sleeping comfort in varied conditions.
2. Insulation Types: Down vs. Synthetic
The insulation within a sleeping bag dictates its warmth, weight, and packing capability. Understanding the differences between down and synthetic insulation can help you choose the best option for your needs.
Down Insulation
- Advantages:
- Excellent warmth-to-weight ratio.
- Highly compressible, packing down small for easy transportation.
- Long-lasting durability (if cared for properly).
- Disadvantages:
- Loses insulation properties when wet.
- Generally more expensive compared to synthetic options.
Example Product: The NEMO Disco series utilizes down insulation, offering superior warmth without excessive weight. These bags come with features like a spoon shape to enhance comfort, perfect for side sleepers.
Synthetic Insulation
- Advantages:
- Maintains insulation properties even when wet.
- More affordable than down.
- Generally heavier but can be robust against spills.
- Disadvantages:
- Bulkier and less compressible.
- May not provide the same warmth per ounce as down.
Example Product: The REI Co-op Flash is a solid choice for those seeking synthetic insulation, offering impressive packability and a 20°F rating while remaining budget-friendly.
3. Temperature Ratings and Seasonal Use
Sleeping bags are categorized based on their temperature ratings, often indicating the lowest temperature at which the bag will keep an average user warm. For example:
- 3-Season Sleeping Bags: Typically rated from 20°F to 32°F, suitable for spring through fall camping. The Sea to Summit Talus is a prominent model that balances warmth and weight effectively for transitional seasons.
- Winter Sleeping Bags: Rated for colder conditions, often below 20°F. A model like the Western Mountaineering Antelope is designed to provide maximum insulation for frigid winter nights without excessive bulk.
- Summer Sleeping Bags: Generally rated above 32°F, such as the Big Agnes Fishhawk, which boasts a lightweight design and good ventilation for warmer weather.
Benefits of Lightweight Sleeping Bags for Backpacking and Camping
When discussing lightweight sleeping bags, it’s essential to highlight their advantages, especially for outdoor activities like backpacking and camping:
- Reduced Weight: Lightweight sleeping bags can significantly decrease your pack weight, which is crucial during long treks. For instance, choosing the REI Magma over heavier models can save several ounces without compromising on warmth.
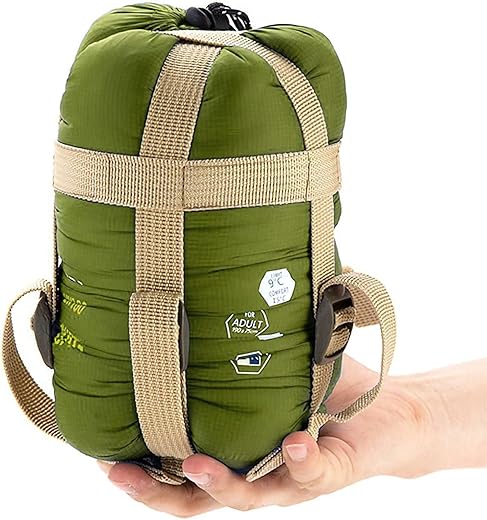
- Compact Packing: The ability to compress sleeping bags for easier packing is invaluable. Many lightweight options come with compression sacks, allowing users to optimize spaces effectively – products like the Therm-a-Rest Questar offer similar compact design features.
- Versatility: Many lightweight sleeping bags are designed for various conditions, making them adaptable for different adventures. For example, models from Kelty, such as the Cosmic Down, are well-suited for both spring hiking and summer camping outings.
Importance of Proper Packing Techniques
Understanding the characteristics of lightweight sleeping bags underlines the necessity of proper packing techniques. Incorrectly packing your sleeping bag can negate many of its benefits, including thermal efficiency and compressibility. Here are some practical tips:
- Use a Compression Sack: When packing a lightweight bag, employ the supplied compression sack to reduce volume. Brands like Outdoor Research even have special bags designed for this purpose with extra straps for tighter packing.
- Avoid Stuffing: While stuffing can be tempting, it may lead to damage over time. Instead, gently fold your sleeping bag for a better lifespan.
- Store Properly Off-Season: Store your sleeping bag in a loose storage sack or hanging to preserve loft and recovery potential.
By considering these factors and approaches, you can make more informed choices when selecting lightweight sleeping bags that meet your specific camping and backpacking needs.
Choosing the Right Packing Method
Packing your lightweight sleeping bag effectively is crucial for maximizing space and ensuring comfort during your outdoor adventures. The right packing method can also extend the lifespan of your sleeping bag by reducing wear and tear. Here, we will delve into the various packing methods available for lightweight sleeping bags, exploring their benefits and drawbacks, and helping you select the best option based on the specifics of your trip.
1. Stuff Sacks
What Are Stuff Sacks?
Stuff sacks are simple bags that allow you to quickly pack your sleeping bag by stuffing it inside. They come in various sizes and materials, often equipped with a drawstring closure for easy access.
Advantages
- Ease of Use: Stuffing your sleeping bag into a stuff sack is a straightforward process. You don’t have to worry about folding or rolling, making it convenient during extended trips.
- Lightweight: Stuff sacks are generally lightweight, making them ideal for backpackers looking to minimize weight.
Disadvantages
- Space Efficiency: While stuffing is quick, it can leave air pockets, resulting in less efficient use of backpack space.
- Potential Compression: Overpacking can lead to unnecessary compression, which may affect the insulation of your sleeping bag over time.
Recommended Products
- Sea to Summit Ultra-Sil Stuff Sack: Known for its lightweight and waterproof capabilities, this stuff sack is perfect for those who might encounter wet conditions.
2. Compression Bags
What Are Compression Bags?
Compression bags are specially designed bags that allow you to minimize the volume of your sleeping bag significantly. They typically feature straps that help compress the contents into a smaller size.
Advantages
- Maximized Packing Space: Compression bags allow you to fit more gear into your backpack, which is especially useful on multi-day trips.
- Durability: Many compression bags are made from robust materials, providing added protection for your sleeping bag from external elements.
Disadvantages
- Potential Damage to Insulation: Frequent compression can lead to permanent damage to the loft of your sleeping bag, affecting its heat retention capabilities.
- Time-Consuming: Packing and unpacking can be more time-consuming compared to stuff sacks.
Recommended Products
- REI Co-op Flash Compression Sack: This lightweight bag features a simple compression system that’s easy to use and offers excellent space-saving benefits, perfect for hikers needing to maximize gear.
3. Rolling Technique
What Is the Rolling Technique?
This method involves rolling your sleeping bag tightly into a cylindrical shape before securing it with straps or packing it directly into your backpack.
Advantages
- Good for Packing: Rolling your sleeping bag can create a more compact shape with fewer air pockets, optimizing your backpack space.
- Mitigates Wear: Rolling can help maintain the insulation loft without squishing the fibers as much as other methods might.
Disadvantages
- Space Outlay: While rolling helps save space, it may not be as compact as a well-compressed sleeping bag.
- Requires Technique: Rolling efficiently requires practice to ensure the sleeping bag is rolled tightly enough.
Recommended Products
- Big Agnes Fish Hawk Sleeping Bag: Its design is particularly friendly towards being rolled, especially with its longer zipper which allows for easy compression.
Comparison Table of Packing Methods
| Feature | Stuff Sacks | Compression Bags | Rolling Technique |
|---|---|---|---|
| Ease of Use | Very easy | Moderate | Requires practice |
| Space Efficiency | Less efficient | Highly efficient | Moderately efficient |
| Potential Damage | Low (if not overstuffed) | Medium (risk of loft damage) | Low (more gentle on insulations) |
| Size/Weight | Lightweight | Medium (may be heavier) | Medium |
| Examples | Sea to Summit Ultra-Sil | REI Co-op Flash | Big Agnes Fish Hawk |
Factors to Consider
When trying to decide on the best packing method for your lightweight sleeping bag, consider the following factors:
- Trip Duration: For quick overnight trips, a stuff sack may suffice. For longer expeditions, a compression bag could be more beneficial.
- Weather Conditions: If rain is expected, a waterproof stuff sack or compression bag is crucial. Look at options like the Osprey Ultralight Dry Sack for maximum protection.
- Backpack Size: Assess how much room you have and choose the method that best fits your backpacking style and the amount of gear you’re carrying.
By understanding the various packing methods, their pros and cons, and the conditions surrounding your trips, you’ll be able to make an informed choice, ensuring a smooth camping experience!
Tips for Packing a Lightweight Sleeping Bag
Packing a lightweight sleeping bag efficiently can enhance its performance, longevity, and overall efficiency in your outdoor adventure. Here are some practical tips to maintain your bag’s loft and insulation properties while making it easier to carry and access.
Avoid Stuffing Too Tightly
One of the most significant factors in preserving a sleeping bag’s insulation is how you pack it. Overstuffing can compress the sleeping bag’s fill, reducing its loft and insulating properties. Here’s how to do it right:
- Use a compression sack wisely: Products like the Sea to Summit Ultra-Sil Compression Sack can help reduce bulk, but avoid cranking down the straps too tightly, as this can squash the insulation layers.
- Loosely pack for transportation: When you’re storing or transporting your bag, opt for a larger stuff sack like the REI Co-op Flash Dry Sack, which allows for snug but not tight packing, preserving loft.
Use a Liner
Inserting a sleeping bag liner can enhance comfort as well as protect the bag itself, reducing the need for frequent washing. Consider these options:
- Silk or polyester liners: Liners from brands like Sea to Summit or Therm-a-Rest not only keep your bag cleaner but can also add insulation on colder nights, helping to maintain warmth.
Benefits of Sleeping Bag Liners:
| Benefit | Description |
|---|---|
| Hygiene | Extends the lifespan of your bag by keeping it clean. |
| Extra warmth | Provides an additional layer of insulation. |
| Easy to clean | Machine washable liners make maintenance simple. |
Keep the Bag Dry
Moisture is one of the biggest enemies of insulation. To keep your sleeping bag in optimal condition, follow these guidelines:
- Use a waterproof stuff sack: Brands like Outdoor Research and Nemo offer waterproof options (e.g., the Outdoor Research Lightweight Dry Sack) that help keep moisture out during hikes and campsites.
- Store safely: In transit or when setting up camp, keep your bag away from wet ground or splashback. If you can, use a sleeping pad as a barrier.
Balance and Accessibility in Packing
Strategically placing your sleeping bag next to your gear can enhance accessibility while maintaining balance in your pack. Here are some packing strategies:
- Top loading or on the side: Pack your sleeping bag either on top of your gear or in a side pocket to provide easy access. The Osprey Atmos AG or the REI Co-op Flash 65 Pack both support organized top loading.
- Balance weight: If packing a tent, place it opposite your sleeping bag for better weight distribution. Distributing weight correctly will help you maintain mobility—your bag should sit above or below heavier items for stability during hiking.
Final Packing Tips
- Compression vs. Storage: Remember that packing your bag tightly for long-term storage can lead to damage. Instead, unroll your bag and store it in a large cotton storage sack, like the Big Agnes Storage Sack, which allows it to maintain its loft.
- Regularly check loft: Before your next trip, unroll your sleeping bag and check for full loft. If it appears flat, give it a gentle shake or hang it for a bit. This ensures it will perform well on your next outdoor adventure.
Following these tips can significantly impact your experience in the wild, allowing your sleeping bag to maintain its performance while reducing your overall packing bulk. Happy camping!
Final Tips for Efficient Packing
In summary, mastering the art of packing a lightweight sleeping bag significantly contributes to a more enjoyable and efficient outdoor experience. By familiarizing yourself with your sleeping bag’s specifications, experimenting with various packing techniques, and adhering to maintenance tips, you can optimize both space and performance. Remember that each adventure is unique, so take the time to find the packing method that suits you and your gear best. With these skills in hand, you’re ready to hit the trails with confidence.


Thanks for sharing your experience! The Sea to Summit bags are great for that. It’s always cool to hear how a good sleeping bag can make a difference on long hikes!
I recently took my Sea to Summit Ultralight Sleeping Bag on a 5-day hike, and I was amazed at how small it packed down! Definitely made my backpack feel lighter. Anyone else had a similar experience?
Pro tip: I always use a compression sack for my sleeping bag – it works wonders in saving space! Also, rolling it up instead of stuffing it helps maintain its loft. Anyone else have packing hacks?
Could you go into more detail about the best ways to pack the sleeping bag for different types of trips? Like car camping vs. backpacking? That’d be super helpful!
Great suggestion! We’ll definitely include more on packing methods for various trips in future articles. Stay tuned!